Kubernetes 101: YAML Manifest
By 8grams Tech
Deploying resources using Kubernetes manifests is fundamentally about describing the desired state of your system or application in a YAML file.
Introduction
In today's cloud-native world, Kubernetes has emerged as a trailblazer, pioneering a fresh approach to orchestrating and managing containerized applications. As an integral part of Kubernetes, manifests serve as instruction manuals for the Kubernetes engine, helping it understand what resources to deploy and manage. This article delves deep into the world of Kubernetes manifests, elucidating their integral role, the concepts behind their deployment, and much more.
What is YAML?
YAML, an acronym for "YAML Ain't Markup Language," is a human-friendly, easily readable data serialization language. It excels in working with data structures typical of high-level languages like Python, Perl, and JavaScript. YAML's easy-to-read syntax plays a pivotal role in its widespread use.
The Structure of a YAML File
In a YAML file, data is structured using indentation and simple punctuation marks. Sequences are denoted by dashes, and key-value pairs are separated by colons. This simplicity and readability make YAML an ideal format for configuration files, such as Kubernetes manifests.
Role of YAML in Kubernetes Manifests
In the realm of Kubernetes, YAML files serve as the backbone for defining and configuring the necessary resources. Kubernetes uses manifests, written in YAML format, to create, modify, and control resources such as pods, services, and volumes. Each YAML file for a Kubernetes manifest describes a desired state for a Kubernetes resource, providing the necessary details like the kind of resource, metadata, and the desired state.
Deploying Resources Using Manifest YAML
Deploying resources using Kubernetes manifests is fundamentally about describing the desired state of your system or application in a YAML file. The Kubernetes system reads this file, understands the specifications you've defined, and then works to make the actual state of the system match the desired state specified in the manifest. This involves creating, updating, or deleting resources as necessary.
When you deploy a Kubernetes manifest, you're essentially providing a blueprint to the Kubernetes system. You're telling it what resources you need, how many replicas of each resource you require, how these resources should interact with one another, and how they should react to changes in the system's state.
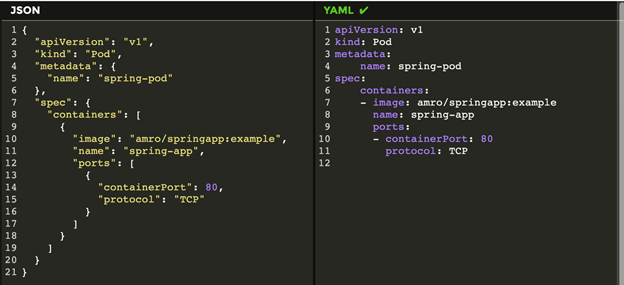
A Kubernetes YAML manifest typically contains several key fields. Here's a basic structure:
apiVersion: v1
kind: Pod
metadata:
  name: my-pod
  labels:
    app: my-app
spec:
  containers:
  - name: my-app-container
    image: my-image:1.0
Now, let's break down each section:
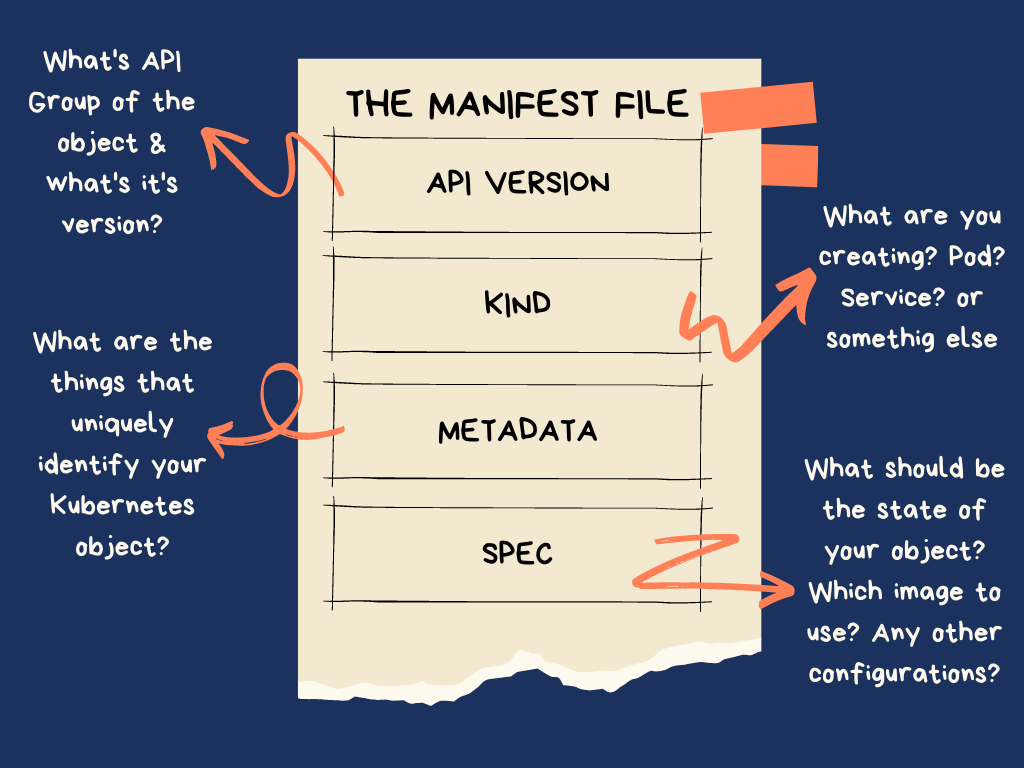
apiVersion: This field is used to determine which Kubernetes API version will interpret the manifest file. The version you choose depends on the resource type you want to create. For example, if you're creating a Pod, you'd usev1. For other resources, like aDeployment, you'd useapps/v1.kind: This field specifies the type of Kubernetes resource you want to create or manage. It could be aPod,Service,Deployment,ReplicaSet, and many others.metadata: This section is used to assign identifying information to the resource.name: Specifies a unique name for the resource within the namespace.labels: Key-value pairs that can be used to identify and group resources.spec: This section is where you define the desired state of the resource. The specifics of what goes into this section can vary greatly depending on thekindof resource being defined.
Behind the Scenes: What Happens When You Deploy a Resource Using Manifest
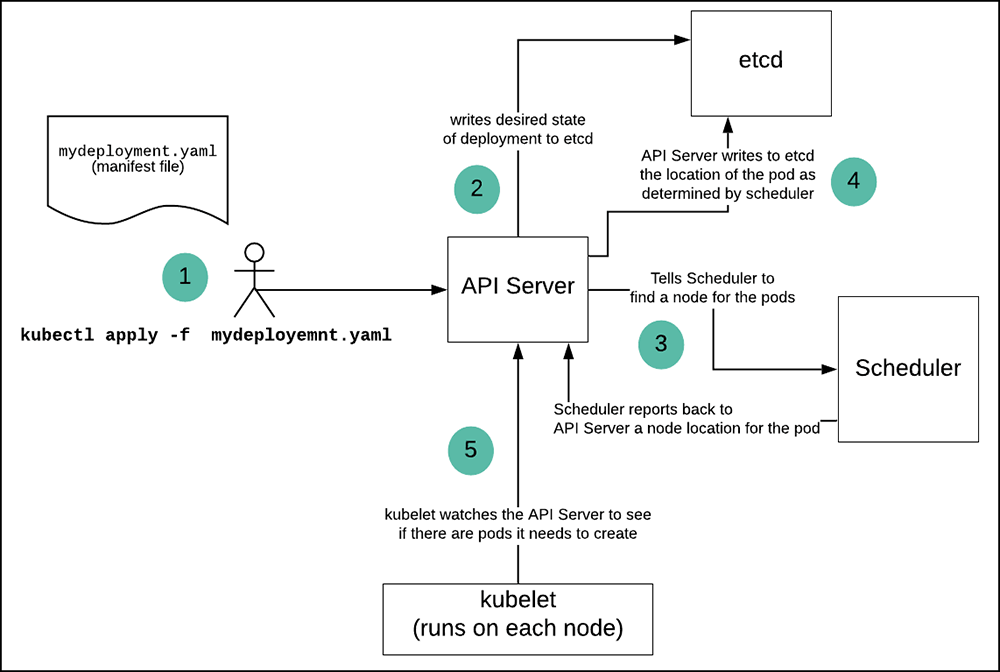
When a Kubernetes manifest is applied, the instructions within the YAML file are sent to the Kubernetes API server. The API server, acting as the frontline of the Kubernetes control plane, validates and processes the request.
Once the API server processes the manifest, it updates the desired state of the system in the etcd, a distributed key-value store that Kubernetes uses to maintain all its cluster data. The etcd stores the current state of the system, and Kubernetes constantly monitors this to ensure the system's actual state matches the desired state.
The control loop within Kubernetes then kicks into action. Various controllers, each responsible for a specific type of resource, continuously monitor the etcd. When they detect a difference between the desired state and the current state, they initiate the necessary actions to reconcile the two, thereby achieving the state defined in the manifest.
Declarative vs. Imperative
In Kubernetes, there are two methodologies to manage resources: the imperative and the declarative approach.
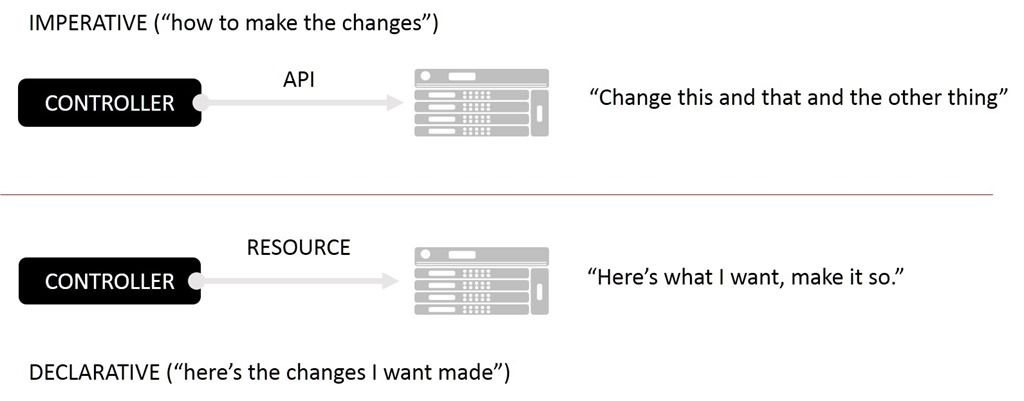
The Imperative Approach
The imperative approach involves giving direct commands to the system to alter its state. You explicitly state the actions to be taken, without focusing on the final outcome. This is akin to manual steering, where you directly manipulate the Kubernetes resources using commands like kubectl create, kubectl delete, or kubectl replace.
The Declarative Approach
On the other hand, the declarative approach involves defining the desired state of the system and letting Kubernetes figure out how to achieve it. Instead of providing step-by-step instructions, you define what the end state should be, and Kubernetes works to maintain this state, making adjustments as necessary. This is akin to setting a destination in a GPS and letting it guide the way.
The declarative approach to Kubernetes resource management is intimately tied to the usage of YAML manifests. When you use this approach, you are defining the desired state of your Kubernetes resources in a YAML manifest. In other words, you are telling Kubernetes what you want your system to look like, not how to get there.
For example, you might have a Kubernetes manifest in YAML format that defines a Deployment. In that YAML file, you'll specify the desired number of Pod replicas. Let's say you set it to 3. That's your desired state: you want Kubernetes to run three replicas of your Pod. You don't tell Kubernetes how to create those Pods, or what to do if a Pod crashes. Kubernetes takes care of all of that for you.
When you apply this YAML manifest using a command like kubectl apply -f deployment.yaml, Kubernetes reads the desired state from the YAML file and then works to achieve that state. It will create new Pods, or terminate existing ones, to ensure that three replicas are always running.
If a Pod crashes and the number of running replicas drops to two, Kubernetes doesn't need you to update the YAML file or run any commands. It already knows, from the YAML manifest, that it should be running three replicas. So it will automatically create a new Pod to replace the one that crashed.
Conclusion
This is the essence of the declarative approach: you declare what you want, and Kubernetes makes it happen, automatically recovering from failures and adapting to changes as needed. You only need to update the YAML manifest if your desired state changes - for example, if you want to run a new version of your application, or change the number of replicas.
This contrasts with the imperative approach, where you would need to run specific commands to create and manage each Pod, and manually replace any Pods that crash. The declarative approach, using YAML manifests, makes it much easier to manage complex systems, and is generally the recommended approach for most Kubernetes users.
About 8grams
We are a small DevOps Consulting Firm that has a mission to empower businesses with modern DevOps practices and technologies, enabling them to achieve digital transformation, improve efficiency, and drive growth.
Ready to transform your IT Operations and Software Development processes? Let's join forces and create innovative solutions that drive your business forward.
Subscribe to our newsletter for cutting-edge DevOps practices, tips, and insights delivered straight to your inbox!
Frequently Asked Questions
What is a Kubernetes YAML manifest?
A Kubernetes YAML manifest is a file that describes the desired state of a Kubernetes resource, such as a pod, service, or deployment. Written in human-readable YAML, it tells Kubernetes what to create and manage. The system reads the manifest and works to make the cluster's actual state match what the file declares.
What are the main fields in a Kubernetes manifest?
A Kubernetes manifest typically has four key fields: apiVersion, which sets the API version that interprets the file; kind, which specifies the resource type such as Pod or Deployment; metadata, which assigns identifying information like name and labels; and spec, which defines the desired state and configuration for that resource.
What is the difference between declarative and imperative approaches in Kubernetes?
The declarative approach defines the desired end state in a manifest and lets Kubernetes figure out how to achieve and maintain it, while the imperative approach issues direct commands like kubectl create or kubectl delete to change state step by step. The declarative approach with YAML manifests is generally recommended for managing complex systems.
What is YAML and why does Kubernetes use it?
YAML, which stands for YAML Ain't Markup Language, is a human-friendly data serialization language that structures data using indentation and simple punctuation. Kubernetes uses YAML for manifests because its readable syntax makes configuration files easy to write and understand, letting you clearly describe the desired state of resources like pods, services, and volumes.
What happens when you apply a Kubernetes manifest?
When you apply a manifest, the YAML is sent to the Kubernetes API server, which validates it and stores the desired state in etcd, the cluster's key-value store. Controllers continuously compare the desired state to the actual state and take action, creating, updating, or deleting resources until the cluster matches the manifest.
Club heritage and international football give every shirt its own connection to a place, era, and group of supporters. Selecting a football jersey can be a natural way to represent an enduring love of the game.