Kubernetes 101: Deployment
By 8grams Tech
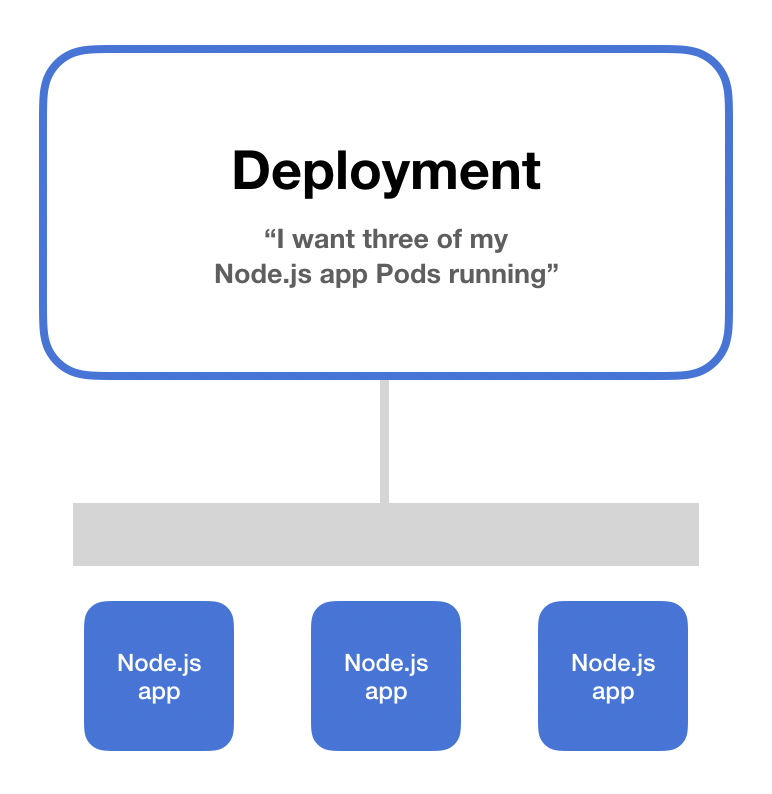
A Deployment runs multiple replicas of an application and automatically replaces any instances that fail or become unresponsive.
Introduction
Kubernetes has carved out a niche for itself in the vast field of cloud computing, with its revolutionary approach to managing containerized applications. This open-source orchestration platform, originally developed by Google, has become the de facto standard for orchestrating and managing containers at scale.
At the heart of Kubernetes lies the concept of Deployment. It's through the Deployment mechanism that Kubernetes ensures the continuity and availability of applications, even in the face of hardware failure or routine maintenance. It is also responsible for maintaining the desired state of the system, keeping the necessary replicas of an application running, and managing the rollout of updates.
What is Deployment (in Kubernetes)?
In the Kubernetes lexicon, Deployment signifies a set of multiple, identical Pods with no unique identities. A Deployment runs multiple replicas of an application and automatically replaces any instances that fail or become unresponsive.
By defining a Deployment, you instruct the Kubernetes system on how to create and update instances of your application. Once the Deployment is created, the Kubernetes master schedules the application instances included in the Deployment to run on individual Nodes in the cluster.
A Deployment is described in a YAML file, where you specify the desired state of the system, including how many replicas of the application should be maintained (specified in the replicas field), which container image to use (specified in the template field), and more.
Deployment and Pods
A Kubernetes Deployment works closely with Pods, the smallest and most basic deployable objects in Kubernetes. A Pod represents a single instance of a running process in a cluster and can contain one or more containers. Containers within a Pod share an IP address, IPC namespace, and other resources, allowing them to cooperate closely.
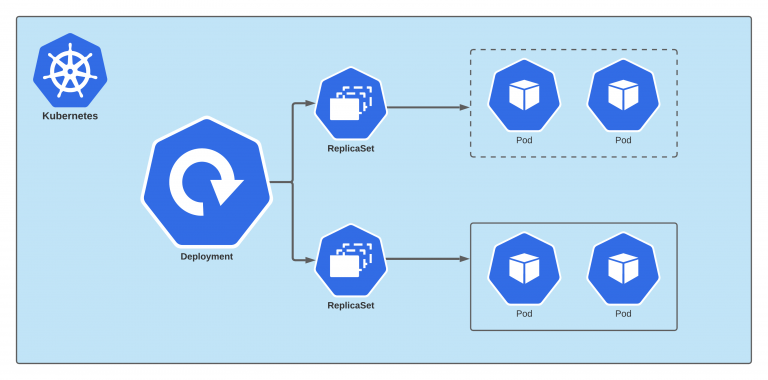
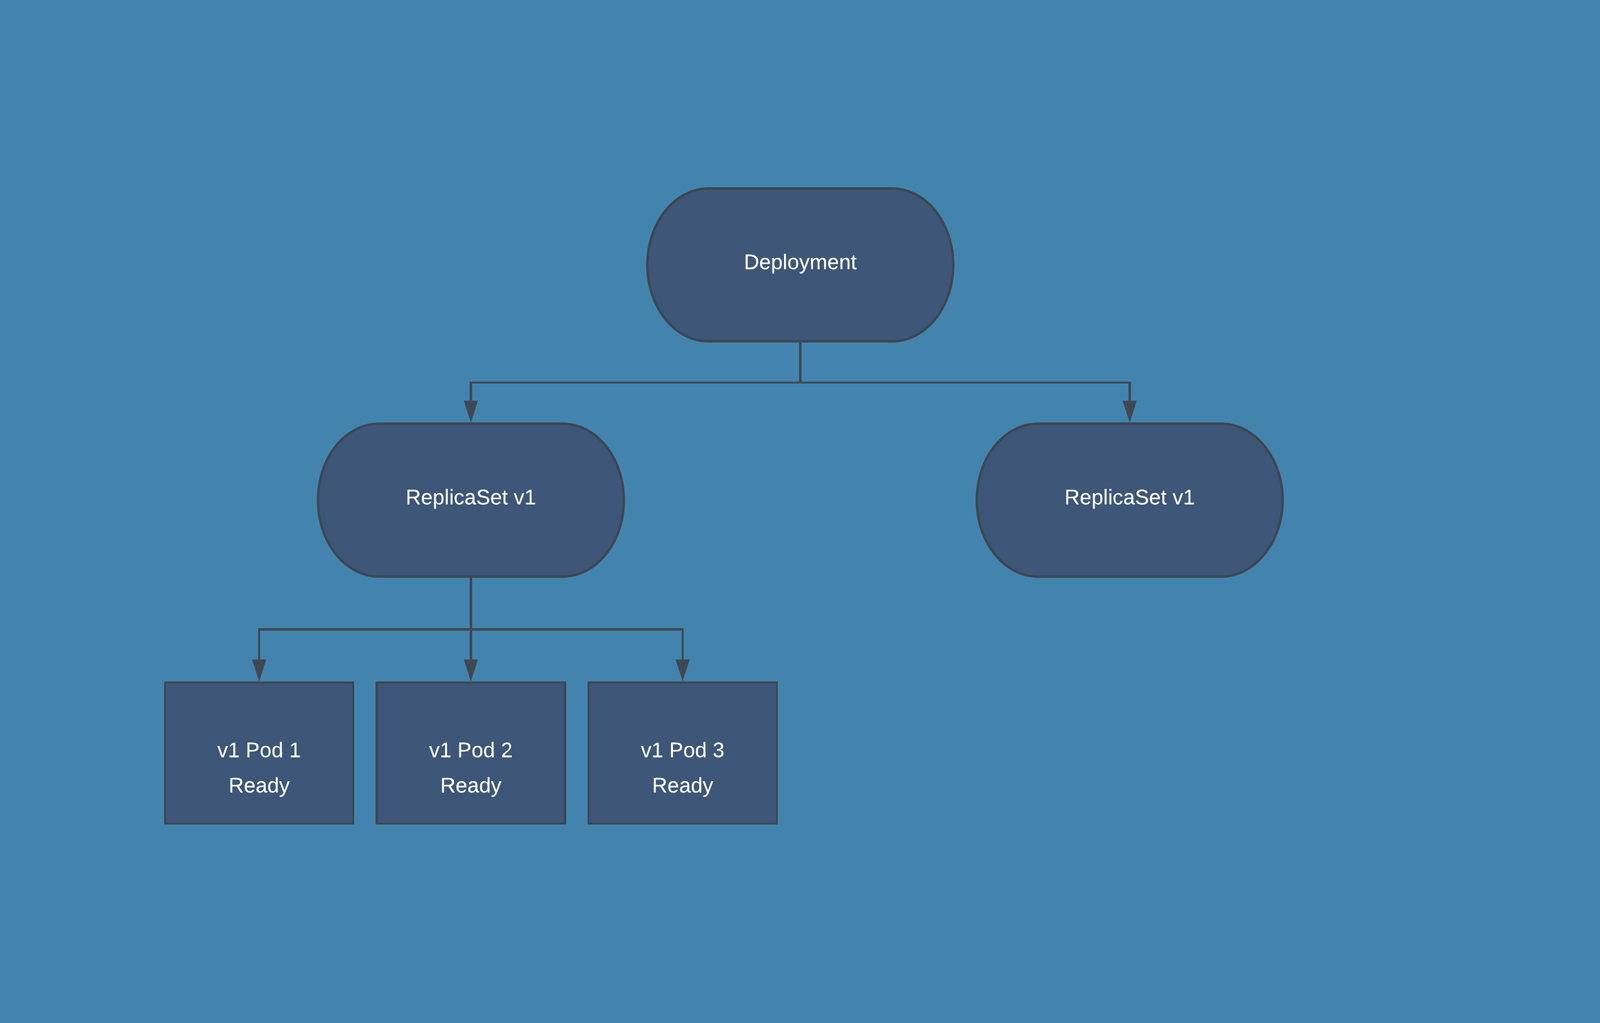
Deployments manage the lifecycle of Pods. When a Deployment is created, it also creates a ReplicaSet to bring up the Pods. If a Pod goes down during its lifetime (due to a crash or node failure), the Deployment makes sure that another Pod is spun up as a replacement, thus maintaining the system's desired state.
ReplicaSet: The Driving Force Behind Pod Replication in Kubernetes
ReplicaSet is an essential resource in Kubernetes that ensures the specified number of Pod "replicas" are running at any given time. It is the next-generation replication controller in the Kubernetes system. The primary purpose of a ReplicaSet is to maintain availability and redundancy of applications by handling the lifecycle of Pods.
Understanding the ReplicaSet Mechanism
A ReplicaSet's purpose is to maintain a stable set of replica Pods running at any given time. It uses selectors, which are set-based or equality-based, to identify the Pods it should manage. This selector is compared to the labels in the Pod metadata to determine if the Pod is part of the ReplicaSet.
The replicas field in the ReplicaSet's specification determines the desired number of Pods. If there are too many Pods, the ReplicaSet will terminate the extra Pods; if there are too few, the ReplicaSet will start more Pods.
Unlike manually created Pods, the Pods maintained by a ReplicaSet are automatically replaced if they fail, get deleted, or are terminated. This is particularly useful if you want to ensure a certain number of Pods are always available to provide a service, even if individual Pods fail.
ReplicaSet and Deployment

While a ReplicaSet ensures the availability of a specified number of identical Pods, it doesn't offer an elegant mechanism to update the Pods. That's where Deployments come in.
A Deployment is a higher-level concept that manages ReplicaSets and provides declarative updates to Pods along with a lot of other useful features. When you create a Deployment, it in turn creates a ReplicaSet, which then spawns the Pods. As the Deployment updates the Pods, it creates new ReplicaSets and gradually shifts traffic to the new Pods, while scaling down the old ReplicaSet.
While it's technically possible to create a ReplicaSet without a Deployment, it's generally not recommended. Deployment provides a robust suite of features beyond what ReplicaSets offer, including the ability to rollback to a previous version and support for various update strategies like Blue-Green and Canary deployments.
Interacting with ReplicaSets
You usually don't need to manipulate ReplicaSet objects directly. They are automatically managed by Deployments. However, if you want to inspect the state of a ReplicaSet, you can use kubectl commands.
For example, to get the list of current ReplicaSets, you can use the kubectl get replicaset command. To describe a ReplicaSet, you can use the kubectl describe replicaset <replicaset-name> command, which will provide detailed information about the ReplicaSet and the Pods it manages.
In conclusion, ReplicaSets in Kubernetes ensure that a specific number of identical Pods are always up and running. While they can be used on their own, they are typically managed as part of Deployments for better flexibility and ease of managing updates. Despite their behind-the-scenes role, understanding ReplicaSets is crucial to comprehending the self-healing and scaling mechanism of Kubernetes.
Deployment on Self-Healing in Kubernetes
Self-healing is one of the most robust features of Kubernetes, and it's primarily facilitated through Deployments. It ensures high availability and reliability of applications by automatically replacing or rescheduling Pods that fail, are deleted, or terminated.
Pods, though the smallest deployable units in Kubernetes, aren't inherently resilient. If a Pod running on a node fails, it doesn't restart on its own. That's where the self-healing capabilities of Kubernetes, provided by higher-level constructs such as Deployments, come into play.
When you create a Deployment in Kubernetes, you specify a desired state. This includes information like the container image to use, the number of Pod replicas to run, and more. Kubernetes continually monitors the actual state of the system, and if it deviates from the desired state you defined (for instance, if a Pod crashes or a node goes down), Kubernetes takes necessary steps to correct it - thus the term self-healing.
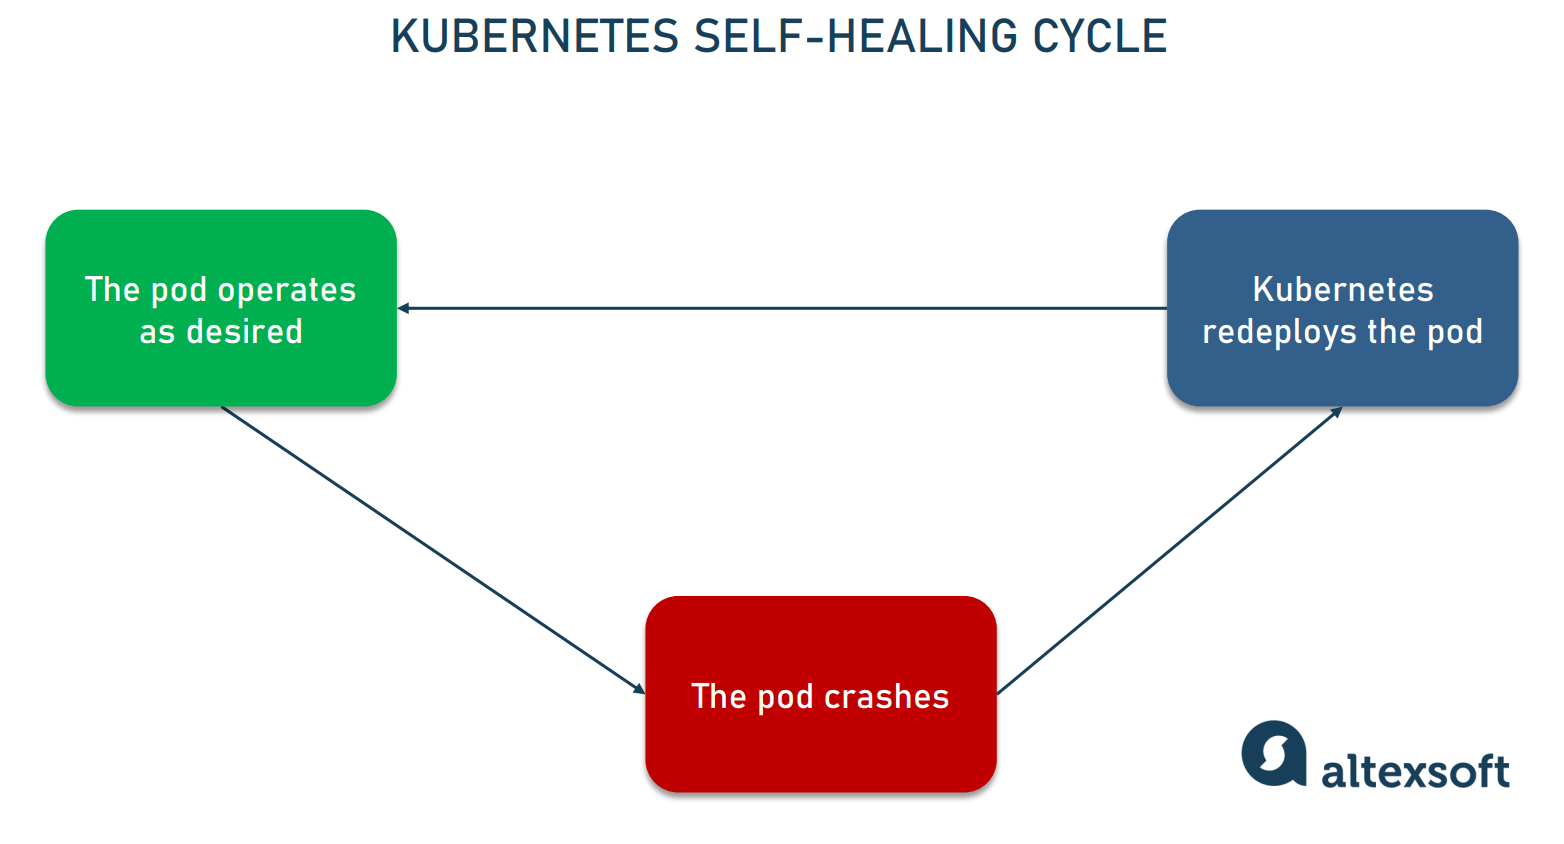
Let's take a concrete example. Suppose you've specified that three replicas of a particular Pod should be running. If one of these Pod replicas fails, the Deployment notices this discrepancy between the desired state (three running Pod replicas) and the actual state (two running Pod replicas). To rectify this, the Deployment instructs Kubernetes to start a new Pod, returning the system to its desired state. This happens automatically without any manual intervention.
It's worth noting that this self-healing process isn't only limited to failed Pods. If a node itself goes down, the Pods running on that node are also lost. However, the Deployment detects this and starts new Pods on other available nodes, ensuring your application remains available.
Deployment on Scalability in Kubernetes
Scalability is another vital feature of Kubernetes, which is also provided by Deployments. In the context of Kubernetes, scalability refers to the ability to handle increased load by adjusting the number of Pod replicas.
Just as with self-healing, you specify the number of Pod replicas in your Deployment configuration. If your application sees increased load, you can adjust the number of Pod replicas accordingly. When you increase the count, the Deployment creates new Pods and schedules them onto Nodes with available resources. Similarly, when you decrease the count, the Deployment removes the excess Pods.
The scalability of Kubernetes Deployments is not only manual but can also be automated using the Horizontal Pod Autoscaler. Based on CPU utilization or custom metrics (like HTTP requests per second), Kubernetes can automatically scale the number of Pod replicas up or down to meet the demands of your application's load.
The Role of ReplicaSets
While discussing self-healing and scalability, it's important to note the role of ReplicaSets. A ReplicaSet is another Kubernetes object that ensures a specified number of Pod replicas are running at any given time. It's the ReplicaSet that's responsible for creating and deleting Pods as necessary to meet the scale requirements specified in your Deployment.
However, while you can create a ReplicaSet directly, it's generally recommended to use Deployments instead. Deployments manage ReplicaSets and provide declarative updates to Pods along with a lot of other useful features. Thus, while the self-healing and scalability in Kubernetes are actually provided by ReplicaSets, they are typically managed and controlled through Deployments.
So, to sum up, Kubernetes Deployments augment Pods by providing self-healing and scalability. By continuously monitoring the state of your system and comparing it to the desired state you've defined, Kubernetes can automatically recover from failures and adjust to load changes, thus ensuring the robustness and responsiveness of your applications.
Rolling Update in Kubernetes Deployment
Rolling updates are a method of progressively deploying changes to your application in a safe way, reducing the risk of causing a service disruption due to a problematic update. Kubernetes has built-in support for rolling updates, which are applied to Pods managed by a Deployment.
Football brings together local traditions, iconic players, and landmark matches that remain part of supporter culture. Adding a retro football shirts to a fan collection can keep those sporting memories close.
When you update the Pod specification in the Deployment manifest (usually the Docker image of your container), Kubernetes starts a rolling update. It creates new Pods with the updated specification and gradually replaces the old Pods while ensuring that the application remains available.

About maxUnavailable & maxSurge
maxUnavailable and maxSurge are both parameters used in the update process of a Kubernetes Deployment. They form part of the update strategy that determines how Pods are replaced when they are updated.
maxUnavailable defines the maximum number of Pods that can be unavailable during the update process. The value can be an absolute number (e.g., 1) or a percentage of the desired number of Pods (e.g., 10%).
For example, if you have 10 replicas running and maxUnavailable is set to 2, then the Deployment will ensure that at least 8 replicas are available at all times during the update. If maxUnavailable is set to "20%", it also means that at least 8 replicas (which is 80% of the original 10) should remain available during the update.
Meanwhile, maxSurge This field defines the maximum number of extra Pods that can be created over the desired number of Pods. The value can be an absolute number (e.g., 1) or a percentage of the desired number of Pods (e.g., 10%).
For example, if you have 10 replicas and maxSurge is set to 2, then the Deployment can create up to 12 Pods (10 desired + 2 surge) during the update. If maxSurge is set to "10%", it means that up to 11 Pods (10 desired + 1 surge) can be created during the update.
These fields provide you with control over the rollout process to ensure the availability and resource usage of your application. If your application can handle some level of downtime, you might want to allow more unavailable Pods to speed up the update. On the other hand, if your application must always be available, but you have plenty of resources, you might allow more surged Pods.
Rolling Back in Kubernetes Deployment
One of the notable capabilities of Kubernetes Deployments is the ability to roll back to a previous version of your application in case of failure or the introduction of bugs. When a Deployment update doesn't go as expected, Kubernetes provides a way to revert back to a previously stable state.
Every time an update is triggered through a Deployment, a new Revision is created, and Kubernetes tracks these Revisions. Each Revision corresponds to a specific ReplicaSet that is holding the Pod template for that version. If you need to rollback, Kubernetes uses the ReplicaSet of the chosen Revision to bring back your previous application version. The process is automatic, controlled, and generally quick, ensuring minimal impact on your application's availability and user experience.
Understanding Revisions in Kubernetes Deployments
Revisions in Kubernetes Deployments are akin to version control for your application's deployments. Each time you update a Deployment in Kubernetes, a new Revision is created. This allows for tracking changes to your Deployment over time and enables powerful features like rolling back to a previous version of the application, ensuring the reliability and stability of your deployed services.
How Revisions Work
When you create a Deployment in Kubernetes, an initial Revision (Revision 1) is created. This Revision corresponds to the initial state of your Deployment, including the Pod template (which contains the container image, port number, etc.).
Each time you update the Deployment, such as by changing the container image or updating the environment variables, a new Revision is created. This new Revision contains a new ReplicaSet with an updated Pod template reflecting the changes made in this update.
Kubernetes automatically tracks these Revisions, incrementing the Revision number each time the Deployment is updated. This allows you to see the history of your Deployment updates and the changes made in each update. You can view these Revisions and their details using the kubectl rollout history command.
Rollbacks Using Revisions
The ability to track Revisions provides a powerful mechanism for managing Deployment updates, particularly through the use of rollbacks.
If a Deployment update introduces an issue, Kubernetes allows you to roll back to a previous Revision. When you issue a rollback, Kubernetes uses the ReplicaSet associated with the chosen Revision to restore your application to its previous state.
In this way, Kubernetes ensures zero downtime as it automatically replaces the Pods from the current (problematic) version with Pods from the previous (stable) version. This all happens without any manual intervention, allowing for quick recovery from failed updates or bugs introduced into production.
To rollback a Deployment, you can use the kubectl rollout undo command followed by the Deployment name, and optionally, the revision number if you wish to rollback to a specific revision.
Managing Revisions
By default, Kubernetes retains all old Replicasets and their associated Revisions to allow for rollbacks. However, you may not always want to keep all Revisions, especially if you frequently update Deployments and are concerned about storage.
To manage this, you can specify the revisionHistoryLimit in the Deployment's spec. This determines the number of old ReplicaSets (and associated Revisions) you wish to keep. Old ReplicaSets beyond this limit will be cleaned up by the Kubernetes garbage collector.
Example of Deployment Manifest
Here is the simple Deployment Manifest example:
Let's break it down:
apiVersion: apps/v1: This is the API version that this Deployment is using. Deployments are part of theapps/v1API group.kind: Deployment: This specifies that the kind of Kubernetes object being created is a Deployment.metadata: This block includes metadata about the Deployment. Thename:field specifies the name of the Deployment (my-app-deployment), andlabels:provide a way to organize different Kubernetes objects. Here we're labeling the Deployment withapp: my-app.spec:This is where the specification for the Deployment is defined.replicas: 3: This line tells Kubernetes that we want to have three replicas of our Pods running.selector: This block is how the Deployment finds which Pods to manage. In this case, we're saying the Deployment should manage Pods with the labelapp: my-app.template: This is the template for creating new Pods. It's what thereplicas:field is referring to when it says it wants three replicas.metadata: This block, nested insidetemplate:, gives metadata to the Pods that will be created. In this case, we're labeling the Pods withapp: my-app.spec: This block, nested insidetemplate:, specifies the Pod specifications.containers: This block contains the specification for the container(s) to be created within each Pod.name: my-app-container: This is the name given to the container.image: my-app:1.0: This tells Kubernetes what Docker image to use for the container.ports: This block defines the network ports that the container will expose.containerPort: 8080: This is the port that the application in the container is set to use.strategy: This field in thespec:section of the Deployment YAML file describes the strategy used to replace old Pods with new ones.type: RollingUpdate: This sets the strategy type toRollingUpdate, which means Kubernetes updates the Pods in a rolling update fashion.rollingUpdate: This field specifies the parameters for theRollingUpdatestrategy.maxUnavailable: 1: This is an optional field that specifies the maximum number of Pods that can be unavailable during the update process. The value can be an absolute number (e.g., 1) or a percentage of desired Pods (e.g., 10%). The default value is 25%.maxSurge: 1: This is an optional field that specifies the maximum number of Pods that can be scheduled above the desired number of Pods. The value can also be an absolute number or a percentage. The default is 25%.
About 8grams
We are a small DevOps Consulting Firm that has a mission to empower businesses with modern DevOps practices and technologies, enabling them to achieve digital transformation, improve efficiency, and drive growth.
Ready to transform your IT Operations and Software Development processes? Let's join forces and create innovative solutions that drive your business forward.
Subscribe to our newsletter for cutting-edge DevOps practices, tips, and insights delivered straight to your inbox!
Frequently Asked Questions
What is a Deployment in Kubernetes?
A Kubernetes Deployment is an object that manages a set of identical, stateless pods and keeps a desired number of them running. You describe the desired state in a YAML file, including the replica count and container image, and the Deployment ensures the cluster matches it, automatically replacing pods that fail or become unresponsive.
What is the difference between a Deployment and a ReplicaSet?
A ReplicaSet ensures a specified number of identical pods are running, while a Deployment is a higher-level object that manages ReplicaSets and adds declarative updates, rollbacks, and update strategies. When you create a Deployment, it creates a ReplicaSet that spawns the pods. Using Deployments is recommended over managing ReplicaSets directly.
How does a rolling update work in a Kubernetes Deployment?
A rolling update progressively replaces old pods with new ones so the application stays available during changes. When you update the pod specification, such as the container image, the Deployment creates a new ReplicaSet and gradually shifts traffic to the updated pods while scaling down the old ones, reducing the risk of downtime.
What do maxUnavailable and maxSurge mean in a Deployment?
maxUnavailable and maxSurge control a rolling update. maxUnavailable sets how many pods may be unavailable during the update, while maxSurge sets how many extra pods may be created above the desired count. With 10 replicas and maxUnavailable 2, at least 8 stay available; with maxSurge 2, up to 12 pods can run temporarily.
How do you roll back a Kubernetes Deployment?
Kubernetes tracks each Deployment update as a revision, and you can revert to a previous one using kubectl rollout undo, optionally specifying a revision number. Each revision corresponds to a ReplicaSet holding that version's pod template, so a rollback restores the earlier pods automatically with minimal downtime when an update introduces problems.