Konga: Setup Dashboard for Kong on Kubernetes Cluster
By 8grams Tech
Konga is an open-source, community-developed management dashboard designed specifically for the Kong API Gateway.
Introduction
Konga is an open-source, community-developed management dashboard designed specifically for the Kong API Gateway. It delivers a user-friendly graphical interface, enabling you to efficiently manage and monitor your Kong infrastructure. Wondering what Kong is? We've got you covered with a comprehensive technical article that you can explore using the link provided below:
Utilizing Konga to manage Kong deployed within a Kubernetes Cluster implies that we can't directly manage Kong resources like routes, consumers, plugins, and so on. This is due to the fact that only the DB-less version of Kong can operate on Kubernetes, making Konga a read-only GUI for viewing the current state of Kong configurations. Nonetheless, this remains quite beneficial as it enables us to observe all configurations through a user-friendly graphical interface.
Installing Konga on Kubernetes
Prerequisites
Before installing Konga, we must first ensure we have a running Kong service. You can refer to the article mentioned earlier to learn how to install Kong on a Kubernetes cluster.
Konga requires a database to store basic configurations related to itself, as well as user configurations. As such, we'll need a PostgreSQL database. To get started with PostgreSQL on a Kubernetes cluster, you can follow the guide provided in the link below.
Keep in mind that Konga currently only supports PostgreSQL 9.6, so be sure to install the correct version. This guide assumes that you've followed the instructions below and created a database called konga with a username admin and password xxx.
Create Deployment, Services, and Ingress
Next, we need to create Deployment, Service, and Ingress resources. The Ingress will utilize an SSL Certificate from Let's Encrypt, provided by Cert Manager. To learn how to generate a free SSL Certificate on Kubernetes, you can check out the article linked below:
Create Kubernetes resources
Install to Kubernetes
~$ kubectl apply -f deployment.ymlTo run Konga migration, first enter the Konga pod, and then execute the migration script within the pod. This will ensure that the necessary database schema and configurations are set up for Konga to function correctly.
~$ kubectl get pods | grep "konga"
konga-xxx   1/1     Running

~$ kubectl exec konga-xxx -it -- /bin/sh

/app# node ./bin/konga.js  prepare --adapter postgres --uri postgresql://admin:[email protected]:5432/konga
Preparing database...
debug: Hook:api_health_checks:process() called
debug: Hook:health_checks:process() called
debug: Hook:start-scheduled-snapshots:process() called
debug: Hook:upstream_health_checks:process() called
debug: Hook:user_events_hook:process() called
debug: User had models, so no seed needed
debug: Kongnode had models, so no seed needed
debug: Emailtransport seeds updated
debug: Database migrations completed!
Exposing Kong Admin API
Konga relies on Kong's Admin API to access Kong configurations. By default, the Kong Admin API is not accessible by other services. For the sake of simplicity, we will publicly expose it in this example; however, keep in mind that this is not considered best practice. Ideally, access should be limited to specific IP addresses (for instance, the Kubernetes cluster's private IP CIDR).
First, let's update the Kong Admin API Deployment to expose its API to other services:
~$ kubectl get deployment
NAME              READY   UP-TO-DATE   AVAILABLE   AGE
ingress-kong      1/1     1            1           5m

~$ kubectl edit deployment ingress-kong
Update spec.containers.env:
- name: KONG_PROXY_LISTEN
  value: >-
    0.0.0.0:8000 reuseport backlog=16384, 0.0.0.0:8443 http2 ssl
    reuseport backlog=16384
- name: KONG_PORT_MAPS
  value: 80:8000, 443:8443
- name: KONG_ADMIN_LISTEN
  value: 0.0.0.0:8444 http2 ssl reuseport backlog=16384
- name: KONG_STATUS_LISTEN
  value: 0.0.0.0:8100
and expose it via Ingress
Great! Everything is properly set up.
Initial Konga Setup
Now, simply open your browser and navigate to the URL corresponding to your Konga instance (e.g., https://konga.example.com) to access the Konga dashboard and start managing your Kong API Gateway.
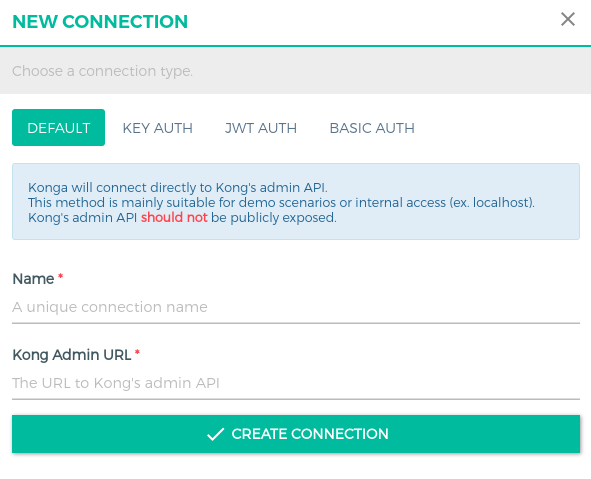
Upon initial login, if no users exist, you'll be prompted to create a new user. After logging in, you'll need to set up a new connection by filling in the Kong Admin URL field with https://kong-admin-api.example.com (based on the Ingress configuration provided earlier). This will ensure that Konga can access the Kong Admin API and manage your Kong infrastructure.
About 8grams
We are a small DevOps Consulting Firm that has a mission to empower businesses with modern DevOps practices and technologies, enabling them to achieve digital transformation, improve efficiency, and drive growth.
Ready to transform your IT Operations and Software Development processes? Let's join forces and create innovative solutions that drive your business forward.
Subscribe to our newsletter for cutting-edge DevOps practices, tips, and insights delivered straight to your inbox!
Frequently Asked Questions
What is Konga?
Konga is an open-source, community-developed management dashboard for the Kong API Gateway. It provides a user-friendly graphical interface for viewing and monitoring Kong infrastructure, such as routes, consumers, and plugins. Konga connects to Kong's Admin API and requires a PostgreSQL database to store its own configuration and user data.
How do you install Konga on Kubernetes?
Install Konga on Kubernetes by first ensuring a running Kong service and a PostgreSQL 9.6 database exist. Apply Deployment, Service, and Ingress manifests, then exec into the Konga pod and run the prepare migration command to set up the database schema. An Ingress with a Let's Encrypt SSL certificate exposes the dashboard securely.
Why is Konga read-only when managing Kong on Kubernetes?
Konga is read-only on Kubernetes because only the DB-less version of Kong runs there, and DB-less Kong loads its configuration from a declarative file rather than a database. Since Konga cannot write changes back to that file, it can only view the current state of routes, consumers, and plugins through the Kong Admin API.
What database does Konga require?
Konga requires a PostgreSQL database to store its own settings and user configurations, and it currently supports only PostgreSQL 9.6. Before running Konga, you create a dedicated database, then run Konga's prepare migration command with the postgres adapter and connection URI to build the necessary schema inside the Konga pod.
How does Konga connect to the Kong Admin API?
Konga connects to Kong through its Admin API, which by default is not exposed to other services. You update the Kong deployment to set KONG_ADMIN_LISTEN and expose the Admin API, typically via an Ingress. In Konga, you create a connection pointing to the Kong Admin URL so it can read Kong's configuration.
Supporter culture is shaped by chants, colours, badges, and the shirts worn on matchday because it links personal memory with the wider culture of the game. Matchday clothing make the shirt part of a broader discussion about football culture. For people following national team history, Ajax retro shirt remains one way to link football history with the practical choice of a shirt. When classic designs return, the shirt works as a cultural object as well as something to wear.