Build Complete Google Kubernetes Engine Infrastructure using Terraform
In this tutorial, we will demonstrate how to provision a Google Kubernetes Engine (GKE) environment entirely using Terraform.
Introduction to Terraform
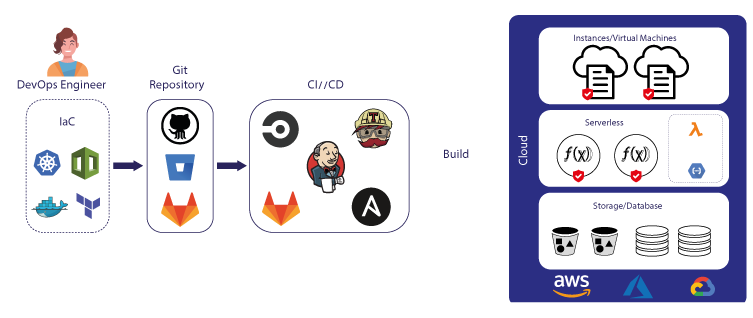
Terraform is a powerful tool in the domain of Infrastructure as Code (IaC), developed by HashiCorp. It allows users to define and manage the complete infrastructure lifecycle using a declarative configuration language. What sets Terraform apart is its ability to manage infrastructure across various cloud providers (like AWS, Azure, Google Cloud) using a single tool. This is especially beneficial for complex, multi-cloud environments. The use of a high-level configuration syntax (HCL - HashiCorp Configuration Language) allows Terraform to declare resources and infrastructure in a readable and writable form.
However, while Terraform brings significant advantages in terms of automation and efficiency, it's not without its challenges. The learning curve can be steep for those new to IaC or declarative programming. Moreover, Terraform manages state, and handling this state across a team or in complex deployments can be intricate. Mistakes in state management can lead to significant issues in infrastructure deployment and management.
Why use Terraform
- Automation of Deployment: Terraform automates the process of infrastructure provisioning, which saves time and reduces the likelihood of human error.
- Consistency Across Environments: With Terraform, you can maintain consistency across various development, testing, and production environments, ensuring that the infrastructure is deployed in a uniform manner.
- Scalability and Flexibility: It scales efficiently with your needs, handling both small and large infrastructures with ease. Terraform's flexibility to work with multiple cloud providers makes it a versatile choice for diverse environments.
- Version Control for Infrastructure: Terraform configurations can be version-controlled, providing a history of changes and making it easier to track and revert to previous states if needed.
- Community and Ecosystem Support: Terraform has a strong community and a rich ecosystem of modules and plugins, which enhance its functionality and user support.
Provisioning GKE using Terraform
In this tutorial, we will demonstrate how to provision a Google Kubernetes Engine (GKE) environment entirely using Terraform. We will also install essential software on the newly provisioned Kubernetes cluster, preparing it for the installation of our application.
Preparation
Google Project
The first item that needs to be prepared is the Google Project itself. GKE resides within a Google Project, so if you don't already have one, you must create it first. The complete tutorial for this can be found at: https://developers.google.com/workspace/guides/create-project.
Bucket for Terraform's State
Next, we will create a bucket in Google Cloud Storage to persist the Terraform State. Terraform will save any changes to its state in this bucket. To create a bucket, go to https://console.cloud.google.com/storage/browser and click the 'Create' button to start the process. Follow the instructions below to create a suitable bucket for Terraform's State:
- Give it a clear name, for example,
cluster-tf-state, and then clickContinue. - For the location of this bucket, choose
Regionto opt for the most cost-effective solution. - Select
Standardas the Storage Class. - Under Access Control, select
Uniformand ensure that 'Public Access Prevention' is enabled. - The final step involves choosing how your data should be protected. There are no specific rules here, so you can select any of the available options.
Enable Compute and Container APIs
Terraform leverages Google APIs to provision all resources outlined in the configurations. The APIs we will use in this tutorial are the Compute API (for VMs) and the Container API (for Kubernetes). Therefore, please follow this link to enable these APIs.
Configuration Template
We have prepared a configuration template that can be used to provision basic GKE infrastructure. You can download it from https://github.com/8grams/gke-terraform-example.
~$ git clone git@github.com:8grams/gke-terraform-example.gitThis template comprises a collection of Terraform code and Kubernetes YAML files. The first step is to open terraform/0-variables.tf. This is an important file containing variables that act as placeholders for your configuration. We must modify it to suit our specific needs and preferences.
If we run our Terraform script as it is now, we will encounter errors from 12-k8s-init.tf and 13-k8s-sa.tf. This is because the Kubernetes cluster itself has not been provisioned yet. Therefore, we need to comment out all content in these files first.
~$ terraform applyUncomment the contents of 12-k8s-init.tf and 13-k8s-sa.tf, and then reapply the Terraform configuration.
~$ terraform applyWait until all the resources we defined are provisioned. After that, open Google Console to see that our resources are available now.
Terraform Walkthrough
If we review the Terraform code file by file, it becomes quite clear how we have defined and provisioned our resources. Starting with 1-provider.tf, it defines the provider we use (Google in this case), where our project resides, and the bucket where we store Terraform's state.
Next, we focus on networking components, starting with VPC (2-vpc.tf), Subnet (3-subnet.tf), Router (4-router.tf), NAT (5-nat.tf), and Firewall (6-firewall.tf).
The VPC configuration is detailed here. For cost optimization, the configuration is designed to choose the most economical option available.
The next configuration involves Kubernetes and its Node Pool. It's quite straightforward: we need a Kubernetes Cluster configuration and then we configure the worker nodes within the cluster.
After the Kubernetes Cluster is set up properly, we can proceed to set up a CloudSQL instance. Google operates its services, including CloudSQL, on a separate network outside our VPC. Therefore, we need to create a VPC Peering connection between our VPC and Google's service networks.
Voila!! Now we have Managed Kubernetes Service running on your Google Project.
Basic Kubernetes Setup
Our Kubernetes Cluster is running, but it's empty right now and we will setup some basic tools in to it: Ingress Nginx, Cert Manager, and PgBouncer for Database pooling. We have covered those stuffs into separate articles that you can check below:


Go to k8s/ingress-nginx, and install Nginx as Ingress
~$ helm repo add ingress-nginx https://kubernetes.github.io/ingress-nginx
~$ helm install ingress-nginx ingress-nginx/ingress-nginx --namespace ingress-nginx --version 4.2.5 --values deployment.yaml
This will also assign a Public IP to the Nginx service (EXTERNAL-IP).
~$ kubectl get services -n ingress-nginx
NAME                       TYPE            EXTERNAL-IP     AGE
ingress-nginx-controller   LoadBalancer    1.111.111.111   5m
Next, we can install Cert Manager and establish a ClusterIssuer that can handle the creation of SSL Certificates. To do this, navigate to the k8s/cert directory and install it from there.
~$ helm repo add jetstack https://charts.jetstack.io
~$ helm install cert-manager jetstack/cert-manager --namespace cert-manager --create-namespace --version v1.5.3 --set installCRDs=true

~$ kubectl apply -f letsencrypt-issuer.yaml
The next step is to install PgBouncer, which is a straightforward process. Go to the k8s/pgbouncer/production directory and install PgBouncer from there.
~$ helm install pgbouncer ./../template -n production -f values.yamlIf everything looks good, then congratulations! Your Managed Kubernetes Cluster is ready for the installation of your applications.


